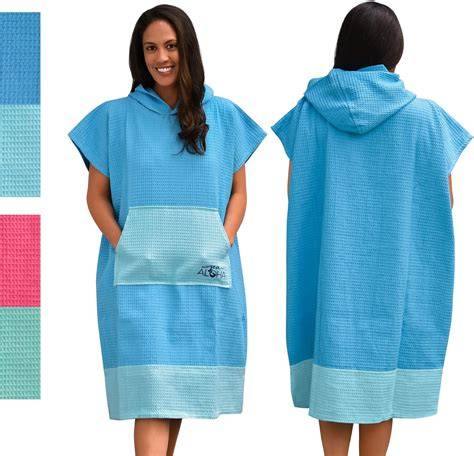
Summer is in full swing so this free sewing pattern for a Surf Towel or Hooded Beach Poncho or however you would like to call it, might come too late for you at this point. Just save this tutorial for next year, the PDF download link is at the end of the article. However, this very practical beachwear is super quick to make. So if you are leaving on a surfing holiday next week, you can still have this ready to put on after a dip in the sea or use it to change into your bathing suit.
Questo poncho è realizzato con due grandi asciugamani da spiaggia e può utilizzare bordi rifinito degli asciugamani stessi per risparmiare tempo e materiale. Ha una cappuccio, due aperture per le braccia e due piccoli spacchi sui lati.
Scelta delle dimensioni e varianti
First, you need to decide what size you need. Are you making this poncho for an adult, a teen, a kid, a toddler? It is up to you and it is very easy to adapt the sizes. Measure: how long you want the poncho to be. From shoulder to knee for example. For the hood: Copy the hood of a hooded sweater or sweatshirt that fits you well. For an adult: Width: between 33 and 47 inches (85 and 120 cm), my beach towels are 41 inches (105 cm) wide, so I went with that width. Length: between 37 and inches 47 (95 and 120 cm), I wanted mine to be below my knees so I made it 45 inches (115 cm) long.
2. Gather all the things you need for this project: fabrics: towel fabric or old towels (see above) tools: sewing machine, matching threads, scissors, sewing clips, measuring tape, fabric marker
Taglio e assemblaggio iniziale
3. Cut the different pattern pieces. If you want to know more about the dimensions you need for the front and back panel, go back to step 1. As I’m using two big beach towels, I used the dimensions of those towels so I can also take advantage of the finished edges of these towels as much as possible. If you can do that, it saves a lot of time in finishing edges or hemming at the end. If the panels consist of different pieces of towel fabric, clip and sew them together right-sides facing and finish the edges. In my case I decide to have the brown fabric on my shoulders and the green towel on the bottom part.
For the hood, fold a hood from a sweater/sweatshirt in half, put it on your double folded fabric. Copy it with enough seam allowance ( ⅝ inch) onto your towel fabric and cut out the two pieces. Try to match the finished edge of the towel with the front edge of the hood so you don’t need to finish these edges. If you want the hood to match the neckline, make sure that the bottom part is the same size. I cut my hood a little too small. I made each piece 11 ½ inches but they should have been 14 ½ inches to match the neckline completely. Don’t make my mistake.
Assemblaggio della cappuccia
4. Assemble the Hood To sew with towels or terry cloth, you don’t necessarily need a specialty presser foot. When the layers get too thick to sew over them comfortably, you can opt to use a walking foot or get help from a bulky seam jumper. Both of these tools are great to sew over thick seams. You have different options to sew these two fabric pieces together. The first one is the easiest: Sew the rounded seam of the two pieces for the hood together, right sides facing. Finish the raw edges with a serger or an overlock stitch and an overlock foot. If you want the raw edges to be hidden, you can use a flat felled seam. I recently wrote a tutorial about this type of seam. The advantage of a flat felled seam is that the raw edges are hidden on both sides, which is perfect for a hood without lining. To sew this seam, you need some extra seam allowance, a ⅜ of an inch allowance is not enough. If you want to add a front pocket or some extra embellishments, attach these to the front panel before step 4.
Marcature e allineamenti
5. Mark the following points on the back panel and the hood: a, b and c the center of the top edge of the back panel (a) the middle of the two hood pieces at the bottom edge, (b) and (c) + measure how long this is (= ¼ of the total bottom seam of the hood) copy that distance from the hood on the shoulder edge of the back panel, from the center towards the shoulder, on both sides, mark (a), (b) and (c). You need these marks on the back panel to know where to stop the shoulder seam. Place the front panel and back panel on top of each other, right sides together, and clip together from each shoulder up to mark (b) and (c). When working with thick towels, sewing clips really are a big advantage compared to pins. Sew the shoulder seam closed from one shoulder point to mark (b) and from the other shoulder to mark (c), right sides facing. If you think the opening for the head might be too small, you can also sew a little more of the hood on the back panel. On the front panel the hood parts will not touch, which is totally ok. To accomplish this, stop sewing 1 inch away from the mark on each side. You’ll have a 2 inches of neckline at the front and a wider head opening.
6. Attach The Hood Match the center of the back panel with the sewn seam of the hood and pin or clip together, right sides facing. Pin the bottom seam of the hood to the neckline from that middle point on, also right sides facing. Sew together. Depending on how big you made your hood, you might need to cut a little slit in the front panel to make the opening for the head big enough. Know that if you do this, you will need to finish that edge.
Rifiniture e riflessi
7. Depending on your towel’s edge, you will need to finish the edges of the front neckline with a double folded hem or some bias tape. You can also do this for the inside of the neckline that might be showing when you don’t wear the hood.
8. You can close the side seams completely - except for the arm hole of course - or leave a slit at the bottom. This is up to you. My armholes are 12 inches from top to bottom and I made the slit the same size, 12 inches from the bottom hem. Measure and mark your armholes and slits and sew the remaining seams closed, right sides facing. If you are having trouble sewing over thick seams with your home sewing machine, maybe try a walking foot or a bulky seam jumper. In the image below, you see me using the bulky seam jumper to sew over the seam that attaches the two different towels.
Save 10% on your first order Be the first to know about our tutorials, weekly deals and so much more! That’s it. This XL surf changing robe or hooded beach towel is ready. It is very cozy and warm on a windy day and truly practical to get changed under comfortably. I’m very happy with this beach robe and -of course- my daughter wants one too! I still have three old beach towels in my closet. I know what to do this weekend! Any questions or tips? Ready. Set …
BERNINA. Spring is here - time to really get going! With the current BERNINA campaign in Switzerland, you can get going like our new brand ambassador Ditaji Kambundji, European champion in the 60 m hurdles, and with full sewing power. Today we’ll show you how to sew a cool surf poncho. How about a self-sewn surf poncho made from bamboo terrycloth? Whether after a swim in the lake, a surf session or just for chilling out - this poncho is the perfect summer companion. You decide how you want your poncho to look like. I’m going to show you how to sew the surf poncho with a stylish patchwork finish. Since the poncho mostly consists of rectangles, it is very easy to cut and a paper pattern would be a waste of resources. Size L/ XL 2. In this technique, you first sew long strips together, cut them into segments and then reassemble them. Use the Patchwork Foot #97 as the presser foot. Seam allowance: exactly ¼ inch (aprox. Now cut the sewn-together strip panel into equally wide segments of 5 cm (2 inches) each. Depending on the desired pattern, this can be done straight or diagonally. For the hood and neckline, sew 2 long patchwork strips together on the long side for each, right sides facing. Here you need two borders with three strips each. Proceed in the same way as for the hood and then sew on a third row. Cut two rectangles of 14 cm x 94 cm (5 1/2 inches x 37 inches) each. Sew side seams of the border and backing pieces together to form one long tube, matching the finished poncho width. Follow the cutting instructions in the PDF guide (link above) and cut the front and back pieces separately. The hood is cut once on the fold. Mark the armholes and side openings on both sides according to the pattern and leave them open. Now it’s time for the side slits & armholes. Now place the hem border tube that you created at the beginning onto the poncho hem, right sides facing. The back of the hem border is now folded around the bottom edge and pinned in place. Fold in the hem so that the previous seam is covered on the inside. Cut a rectangle for the back in the size 10×79 cm (4 inches x 31 inches). Fold the backing over the hood edge. Here you baste the backing by hand the same way you did with the bottom edge. Fold the border over to the reverse side. Sew on the rectangle of fabric or patchwork by folding it over and in. Then sew the hood to the neckline and overlock the seam allowance. Finish the hood border the same way you did with the bottom edge (from the front in the seam shadow). The surf poncho is almost finished! Now the Seminole patchwork is quilted using the freemotion technique. The BERNINA Stitch Regulator (BSR) is particularly useful here. Of course, you can also use other presser feet to make this pattern. The thread colour should ‘disappear’ so that the play of light and shadow on the quilting stands out, not the thread. Select BSR mode 1, lower the feed dog, bring up the bobbin thread through the fabric layers first so that it cannot nest on the underside, and knot the threads by hand when you are done. Caution: After a few stitches, check the thread tension on the underside and adjust if necessary. If you want to achieve very regular waves, then you can use the following trick. Draw a wavy line in the centre of the border using the quilt ruler and trick marker. You can then quilt along these wavy lines with the presser foot. Attach the eyelets in the centre of the patchwork squares according to your manufacturers instructions and finally thread in the cord. Knot the ends so the cord can’t be pulled through the eylets. Your surf poncho is finished - that was easy!
La stagione di nuoto sta arrivando. Ready. Set. Create. Ma surfeuse de fille en rêvait, je l’ai fait !
Beach Poncho Tutorial - made out of two towels
Cousu main, enfin presque, disons que je suis partie d’une base déjà existante (le poncho de bain premier prix chez Decathlon) et que je l’ai amélioré à ma sauce pour qu’elle ait toutes les options possibles. J’ai tout fait un peu au pif, sauf la capuche, que j’ai tracée sur mesure en suivant cette méthode trouvée sur le site de Petit Citron. Pour la poche kangourou, j’ai repris le modèle d’un sweat que j’avais déjà, et idem pour la poche poitrine, elle vient d’une veste de mon chéri. Je me suis amusée à la customiser avec ma Cricut et des stylos Infusible Ink, un jeu d’enfant. Je recommencerai certainement très vite car maintenant son petit frère veut un poncho pour lui, et j’ai encore tout un stock de vieilles serviettes en microfibre qui n’ont pas très bien vieilli et qui seront parfaites à upcycler !
Les sections en espagnol et autres éléments sont inclus pour démontrer la variété; vous pouvez choisir le style qui vous convient le mieux pour votre poncho de surf.
tags: #tutorial #poncho #accappatoio #da #surf